WHAT – EC2 Multiple Virtual Web hosting with different Virtual IPs
WHY – When you want to host multiple websites in EC2 with Cloudfront
HOW – Create Web server, Elastic Load Balancer & CloudFront Distrubution
Services – EC2, ELB, Cloudfront.
Part 1: EC2 Web Configuration
Create an EC2 Instance (Ubuntu / AL2) and attach virtual IPs.
The attached virtual IP by default recognized by AL2 without any more actions. You can check with command ip -a
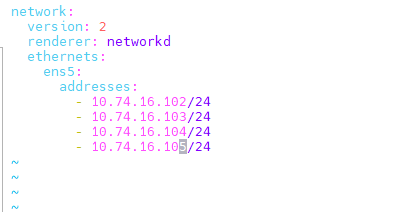
But for ubuntu you need to update the OS manually. Usually, the network configuration will be in /etc/netplan/50-cloud-init.yaml . Create a secondary file (new) /etc/netplan/60-secondary-ip.yaml with the following content. In the following example .102 is the primary IP and remaining are seconday Ips.
Testing – Make sure all the Virtual IP are serving the site. X.com, Y.com, Z.com …. By adding host entries with the internal Ips.
Part 2: Target Group Configuration
Create three target Groups. CG-WEBGROUP-01, CG-WEBGROUP-02, CG-WEBGROUP-03
- Create Target Group
- Choose a target type – IP addresses.
- Target group name – TG01
- Protocol HTTPS & Port 443
- Select VPC
- Health Checks – HTTPS & 443
- Next – Network – Select VPC
- Specify the IP Address & Defined ports – 10.74.16.101 (Virtual-IP-1) & 443
- Include as pending below.
- Click Create Target Group
Repeat for the same to create other Target Groups with the required virtual IP.
Part 3: Elastic Load Balancer Configuration
- Load balancer name: CG-FELB-WEB-01
- Scheme: internet-facing (cannot be changed later)
- Ip address type: IPv4
- Network Mapping: Select VPC
- Security Groups: Inbound allow port 443 Only to Cloudfront prefix(com.amazonaws.global.cloudfront.origin-facing)
- Listener and Routing – HTTPS : 443 Default Action – WorkGroup-01
- Secure listener Settings —
- Security Policy – Default recommended.
- Default SSL/TLS Certificate (Select you certificate from Load Balancer for the proper domain name Example. awslb01.domain.com
- Add on Services : AWS Global Accelerator is a Optional
- Click Create Load Balancer
- After Creation edit the load balancer and update attributes accordingly
- Example:
-
- X-Forwarded-For header – Preserve
- Preserve host header – On
- Client Port Reservation – On
- Access Logs – On
- Deletion Protection – On
- Edit Listener & Rules
- Update the default rule to response 503 with text message “success” instead of forwarding to target group WorkGroup-01
- Add Rule
- Name – x.com
- Add Condition – Select “HOST HEADER” and provide the value – domain name y.com – Confirm
- And then forward to Target Group – Workgroup-01
- Next and save.
- Note: Add all other available virtual sites z.com ……forwarding to concern Target Group.
Testing: Check the load balancer URL https://…… & the custom domain https://awslb01.domain.com
Note: awslb01.domain.com – You should get the default site response (You need to update security group to allow 443 to 0.0.0.0/0 (just for testing)
Part 4: Cloud Front Configuration
- Origin domain name – awslb01.domain.com
- protocol HTTPS only
- Minimum origin SSL protocol – Leave default
- Name – awslb01.domain.com
- Origin Shield – Optional to enable
- Additional settings leave default
-
- Connection attempts
- Connection timeout
- Response timeout
- Keep-alive timeout
- Default Cache behavior
- Compress objects automatically
- Viewer Protocol Policy – HTTPS Only
- Allowed HTTP Methods – GET, HEAD, OPTIONS
- Restrict viewer access – No ( for signed URLs)
- Cache key and origin requests – Select Legacy Cache settings
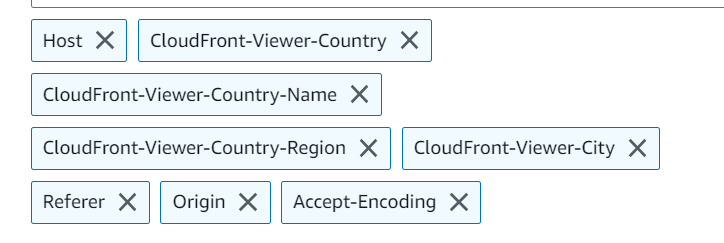
- and add headers – Host (important for us as we are using host header forwarding in load balancer). Select as per your requirement.
- Choose which cookies to include in the cache key. Select accordingly. I need cookies so selected “All”
- Response headers policy – Select accordingly (SimpleCORS)
- Enable Logs if required.
- Note – Add all your CNAMEs x.com, y.com, z.com etc to the Cloudfront and Select the SAN SSL certificates from certificate manager (you should import it before) which has all these domains.
Testing – x.com, y.com z.com